Nickis Diapers

Saturday, December 1, 2012
Free shipping!
Great news! Nicki's Diapers is offering free shipping on any size order in the US with code DECFREESHIP! This offer is good only on 12/1 and 12/2, so don't miss out! Click the banner above to go to their site!
Tuesday, November 27, 2012
Best Bottom Diaper Sizes, Diaper Sprayer, and more
You can see in this photo how trim the diapers fit! We are able to use these same diapers (with overnight inserts), for overnight use. They last 12+ hours without a problem.
 | ||
| Caleb sporting a Cookies and Cream Best Bottom |

Best Bottom Inserts come in three sizes. Small to large in this image.
 |
| inserts stacked |
 |
| Inserts side by side |


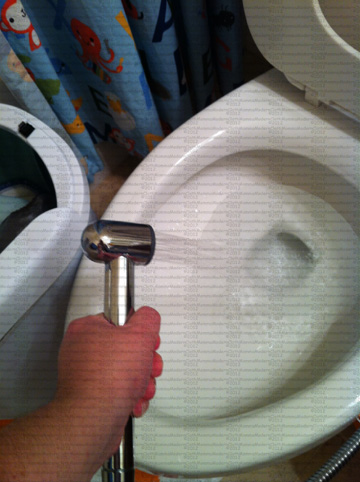
I did not show dirty diapers in these photos beyond the pail, so don't worry! The sprayer does have a much higher pressure than I show, but I didn't want to make a mess spraying with my iPhone in the way!
 |
| This is a Bidet Sprayer from Home Depot. It ran about $40. I find I like this one much better than the Bunginus sprayer we had before. It attaches to the intake for the toilet, has an on and off lever, and hangs from the toilet. |
 | |
| Sprayer running, low pressure |
 | ||
| Full diaper pail, this is about 2 1/2 days worth of diapers for my son. |
Now for the fake spray images. I couldn't spray the diaper and take the picture, so you need to use some imagination. I hold the soiled diaper partially in the toilet bowl, above the water and spray off poop. Sometimes I hold just the insert, sometimes the whole diaper depending on how messy it is. If I spray the whole diaper, I do this with the insert unsnapped, spray both sides and the shell, then they both get dropped in the pail.

With a Fuzzibunz, the process is similar. I usually spray off the majority of the poop if it doesn't roll off, then pull the inserts out, spray those, and then spray the stay dry material on the shell, they all get dropped in the pail after spraying.

Again, as always, feel free to message me here or email if you have questions!
Friday, November 23, 2012
Nicki's Diapers Black Friday Sale!
There is a great sale over at Nicki's Diapers! Discount code BF2012 for 10% off already great sale prices! The sale runs through November 26th!
Nicki's Diapers
Nicki's Diapers
Fuzzibunz Black Friday Sale!
There is a great deal on Fuzzibunz diapers for Black Friday! Buy 4 get 2 free! The sale runs through Cyber Monday, so if pocket diapers are for you, this is a great chance to get a deal.
Shop Fuzzibunz
Shop Fuzzibunz
Saturday, November 10, 2012
The Ongoing Saga of Cloth and Ammonia
***new note! I now wash every 2.5 to 3 days. I use 4-5 tbs powdered tide and calgon in each wash. 5/6/14
Well, my tried and true method of getting rid of ammonia failed me a month ago. My son's overnight diapers reeked in the morning of ammonia and he even got an ammonia burn from one. I washed, stripped, boiled, soaked in cloth safe detergent, soaked in ammonia bouncer, and even tried fish tank ammonia remover. Nothing worked. These methods would improve the ammonia for one time, but weren't fixing the problem.
Understandably I was frustrated! I mailed the company that made my CD safe soap and worked with them for a few weeks. None of their methods were working. I turned to my local diaper circle leader and pleaded my case, and gave my attempts at fixing the problem. It turns out the solution was in two things I had been told.
First, switching to a non CD detergent. Tide was recommended by Nicki's Diapers after they had been testing it on Best Bottom diapers for quite some time. The other part that was needed was a good soak.
I used 1/4 cup of Tide and soaked my diapers overnight. After that I washed and rinsed until all bubbles were gone. This took hours, but the end result is diapers that no longer stink or burn my son!
I tried switching back to my CD safe detergent, and after 1 wash, the ammonia was back, so I stripped again, soaked again, and we were back in business!
I now am washing my diapers with a different routine that I posted below.
First is still a pre-wash/rinse. My setting for this is the comforter setting because it adds more water. I do this on WARM because it will rinse the ick better.
Next is a heavy duty wash on HOT with 3 TBS tide and 3 TBS Calgon water softener with an extra rinse.
At the end of this cycle, I remove PLU shells, wetbags, and pail liners. These hang to dry.
I then run cold rinses until there aren't any more soap bubbles when I stop the rinse cycle.
So far this is working and it's again, a simple wash routine.
Tuesday, August 14, 2012
Suds, suds, and more suds
Last week I started having an ammonia issue with my overnight diapers. I know this is usually caused by a buildup of soap in the diaper itself, usually because they aren't being rinsed enough. So, I did a load of diaper laundry. Low and behold, suds galore!
It took hours to rinse the diapers enough. I couldn't figure out what was wrong. I hadn't changed soap or how much I was using. Then it dawned on me, I hadn't run my washing machine cleaner in over a month and a half!!
While this doesn't seem like a big deal, soap had been building up in the washer, making my diaper laundry a nightmare. We use a different soap for regular clothes, and apparently they don't rinse all the way.
So, on Sunday I ran my Tide washing machine cleaner through the machine. Monday morning I started a load of diaper laundry. I used my normal routine, and no suds after the second rinse!
It really is amazing the little things that we can do that can really foul up our diaper washing routine!
Monday, August 6, 2012
What would you like to know?
I'm opening this post up to see what you, as a reader would like to know about cloth diapering. I had a LOT of questions when starting out. Post in the comments below!
Saturday, July 28, 2012
Just some cuteness for today. I talk all about cloth diapers, but I haven't shown them in action. Here are a few photos to show how they look on a real baby. :)
Now, the best thing about all these diapers, is he can still wear them all! He's now 16 1/2 months old and we don't need to buy diapers. I've said this to many people, the cost savings is amazing, especially with a child that has problems with commercial disposable diapers. We purchased our whole stash for around $500. Compare that to the disposable diapers he can tolerate which run $80 per month.
I also use cloth wipes, which aren't bad! You can use a wipe solution, or just plain water. I fold my wipes so they pop out of a wipe container, wet the stack, and when they are soiled, spray with the diaper sprayer and toss in the diaper pail. This saves having a garbage pail of soiled wipes sitting in my son's room or bathroom. I recently started making wipes out of an old flannel sheet that we don't use any more. I cut 8x8 squares and do a zigzag stitch around the edges. I have NO sewing experience and I can make them. They are super soft from being washed so much over the years.
Now, my newest discovery is the thriving resale community of cloth diapers. I was surprised at the high resale value of some of these diapers. If well taken care of, people are getting up to 50% back! Now, this is for diapers in very good condition with no stains, but taking the time to sun out any stains is worth it if you're reselling!
 |
| We were part of the Great Cloth Diaper Change this year! |
 | ||
| Caleb, about one month old wearing his Chunky Monkey Best Bottom Diaper |
 | |
| Moolicious Best Bottom Diaper about 3 months old |
 |
| Green Giraffe Best Bottom Diaper, about 3 months old |
 |
| Caleb Helping |
I also use cloth wipes, which aren't bad! You can use a wipe solution, or just plain water. I fold my wipes so they pop out of a wipe container, wet the stack, and when they are soiled, spray with the diaper sprayer and toss in the diaper pail. This saves having a garbage pail of soiled wipes sitting in my son's room or bathroom. I recently started making wipes out of an old flannel sheet that we don't use any more. I cut 8x8 squares and do a zigzag stitch around the edges. I have NO sewing experience and I can make them. They are super soft from being washed so much over the years.
Now, my newest discovery is the thriving resale community of cloth diapers. I was surprised at the high resale value of some of these diapers. If well taken care of, people are getting up to 50% back! Now, this is for diapers in very good condition with no stains, but taking the time to sun out any stains is worth it if you're reselling!
Wednesday, July 18, 2012
I forgot to type this yesterday. The owner of this blog takes no responsibility for damage to your diapers or washer if you follow any suggested washing routines. Always check with your manufacturer if you need more advice. Some of the stripping methods may void the warranty on your diapers. I have developed these methods working with retailers of my diapers, yours may be different.
Tuesday, July 17, 2012
Sorry for the long hiatus, life has been busy.
I've been seeing a lot of laundry questions on the cloth diapering boards. Many revolving around stinkies and HE washing machines.
A little over a year ago, I was in the market for a new washer and dryer. I knew that I was going to be washing cloth diapers and I knew many people recommend a top loader, but I really wanted a front loader. I did a lot of research on the machines, and laundry routines.
The machine I chose was a Maytag 2000 Series.

I do my laundry every two days or so. I use a combination of Best Bottom Diapers and Fuzzibunz. This is a detailed post of my laundry routine.
Here is what the settings look like on my washer for a normal cloth load AFTER the normal cold wash without soap.


I would hang my inserts to dry, but my drying rack doesn't have enough room, and my HOA says I can't lay them outside to sun to dry. If you choose to line dry, you can throw the inserts in the dryer for 10 minutes without heat to soften them up after.
Once a month or so, you should strip your diapers as regular maintenance. There are several ways you can do this.
The easiest is several hot washes without soap. This removes any soap residue that may have built up on your diapers. I always recommend this one first if someone is having troubles with their diapers.
Next, if the hot washes don't work, you can use a product like RLR to wash your diapers in. If you are using PLU shells, don't strip them, just do the inserts. I haven't used this product, but I've heard great things about it when used properly. Make sure you rinse enough times to get all the suds out.
Original Blue Dawn also works as a stripping agent. In a top loader washer, I've heard you can use up to 2 TBS. I don't use that much, I add it in drops on an insert and throw the insert in the wash. I use between 5-10 drops in my washer if I need to strip. Remember, this can damage an HE washer, so use this method at your own risk!
On inserts only, you can also wash with 1/4 cup of bleach. This will kill bacteria which causes stinkies.
Since most of the country has hard water in some shape or form, I NEVER recommend using vinegar in your rinse cycle. If you have hard water, vinegar will make the smell problems worse, not better.
Now, if you're having stink issues with your diapers, what is suggested you do is different depending on the kind of stink. If you are getting a barnyard/animal/dirty smell, that is bacteria caused by not using enough soap. I suggest doubling your detergent and washing again. If it continues, add more soap. I've seen people using as little as 1 tsp of soap (way too little) and then complaining of stink issues. I too was afraid of using too much soap and dealt with this myself. After discussing the problem with Annie from Nicki's Diapers, I doubled my detergent and washed again. My stink issues went away!!
The other stink you can have is ammonia, which is harder to get rid of. It can be caused by many things, but believe it or not, soap buildup is one. I wash my diapers like normal, then run a strip cycle with bleach, then wash again. Then to make sure the bleach is gone, I do either a dawn strip cycle or I use some Arm and Hammer Free and Clear. Then it's the rinsing game to get rid of the soap. If the problem persists, I narrow down the culprits, (usually a couple of overnight doublers) then I wash and soak for 12 hours in Rockin Green Funk Rock, then wash.
Padded Tush Stats has a fantastic flow chart about stink issues. If you're having problems, I would look there!
I've been seeing a lot of laundry questions on the cloth diapering boards. Many revolving around stinkies and HE washing machines.
A little over a year ago, I was in the market for a new washer and dryer. I knew that I was going to be washing cloth diapers and I knew many people recommend a top loader, but I really wanted a front loader. I did a lot of research on the machines, and laundry routines.
The machine I chose was a Maytag 2000 Series.

I do my laundry every two days or so. I use a combination of Best Bottom Diapers and Fuzzibunz. This is a detailed post of my laundry routine.
- First, normal cold wash, no soap
- Second, Heavy duty wash, 2 TBS Rockin Green Classic rock, second rinse (TEST your water to find the proper formula for your water. Don't rely on the chart)
- Remove the PLU pail liner, and Best Bottom shells, hang them to dry.
- Wash again, normal hot wash, second rinse, NO soap
- Hang Fuzzibunz shell, inserts and cloth wipes in the dryer.
Here is what the settings look like on my washer for a normal cloth load AFTER the normal cold wash without soap.


I would hang my inserts to dry, but my drying rack doesn't have enough room, and my HOA says I can't lay them outside to sun to dry. If you choose to line dry, you can throw the inserts in the dryer for 10 minutes without heat to soften them up after.
 |
| My covers, small Planet Wise wet bag, and Planet Wise pail liner drying. This is a normal load every 2 days. |
Once a month or so, you should strip your diapers as regular maintenance. There are several ways you can do this.
The easiest is several hot washes without soap. This removes any soap residue that may have built up on your diapers. I always recommend this one first if someone is having troubles with their diapers.
Next, if the hot washes don't work, you can use a product like RLR to wash your diapers in. If you are using PLU shells, don't strip them, just do the inserts. I haven't used this product, but I've heard great things about it when used properly. Make sure you rinse enough times to get all the suds out.
Original Blue Dawn also works as a stripping agent. In a top loader washer, I've heard you can use up to 2 TBS. I don't use that much, I add it in drops on an insert and throw the insert in the wash. I use between 5-10 drops in my washer if I need to strip. Remember, this can damage an HE washer, so use this method at your own risk!
On inserts only, you can also wash with 1/4 cup of bleach. This will kill bacteria which causes stinkies.
Since most of the country has hard water in some shape or form, I NEVER recommend using vinegar in your rinse cycle. If you have hard water, vinegar will make the smell problems worse, not better.
Now, if you're having stink issues with your diapers, what is suggested you do is different depending on the kind of stink. If you are getting a barnyard/animal/dirty smell, that is bacteria caused by not using enough soap. I suggest doubling your detergent and washing again. If it continues, add more soap. I've seen people using as little as 1 tsp of soap (way too little) and then complaining of stink issues. I too was afraid of using too much soap and dealt with this myself. After discussing the problem with Annie from Nicki's Diapers, I doubled my detergent and washed again. My stink issues went away!!
The other stink you can have is ammonia, which is harder to get rid of. It can be caused by many things, but believe it or not, soap buildup is one. I wash my diapers like normal, then run a strip cycle with bleach, then wash again. Then to make sure the bleach is gone, I do either a dawn strip cycle or I use some Arm and Hammer Free and Clear. Then it's the rinsing game to get rid of the soap. If the problem persists, I narrow down the culprits, (usually a couple of overnight doublers) then I wash and soak for 12 hours in Rockin Green Funk Rock, then wash.
Padded Tush Stats has a fantastic flow chart about stink issues. If you're having problems, I would look there!
Help My Diapers Stink! Tips Resolving Whiffing Woes by Tara
Another issue is making sure that you are getting all the soap rinsed out of your diapers. In my washer, an easy way to check is to run a rinse cycle. It takes about 5 minutes to fill, then it starts to agitate. During this time, I can push pause (same as lifting the lid on a top loader.) I can then observe the bubbles through the glass. Bubbles that pop in 30 seconds are agitation bubbles, these are normal and expected. This is not soap build up and the diapers can be dried when the spin cycle is finished. Bubbles that don't pop (think a bubble bath) are soap bubbles and you need to run more rinses until these are gone.
Here are photos of the two types of bubbles.
 |
This is soap bubbles after I added too much soap on a strip cycle and several rinses. |
 |
This is agitation bubbles. I did one more rinse after this, but I would have been fine drying them at this stage. |
Sunday, June 10, 2012
Short post tonight, I've been busy. Tomorrow, June 11, 2011 there is a one day sale at fuzzibunz!
Anyone want a promo code for fuzzibunz? They are launching the new affiliate site tomorrow (hopefully, it's down now) and I have a code for 10% the entire purchase for one day only. This includes the training pants!
The link has a kink in it right now, but I'm hoping it will work in the morning. Each purchase through my link helps me out. This is my WAHM venture.
Here's the link The New Fuzzibunz Site
If it's working, you'll see the site with a green background.
Coupon code: ONEDAY
Thursday, May 17, 2012
I have my new cloth diapers, now what?
After you purchase your new fluff, there are some things you now need to do.
First of all, you need to prep your diapers. This is easy. If you have microfiber or minky inserts, you just need to run the inserts and shells through a wash cycle and dry them. Make sure all the detergent is rinsed out before drying.
Now, if you have natural fiber inserts, you will need to do a much longer prep. These need to be washed at least six times before use. I wash mine ten times. With each wash they become more absorbent. The very first wash of natural fiber diapers needs to be with towels or by themselves. Sometimes the diapers have natural oils on them that can transfer to your synthetic fibers. This won't ruin them, but will cause extra work for you.
After the prepping is finished, all diapers can be washed together. Like I said, I use the following routine. A more complicated wash routine sometimes is harder on you, and sometimes doesn't work as well.
My diapers are prepped and ready to go on my baby. Anything else I should know?
When you put your new fluff on your baby, know this first. Diaper creams are not needed and in fact can harm your diaper and void your warranty. If you need a cream for some reason, coconut oil works wonders, and washes out in the hot wash cycle. If you use it and your diapers are still under warranty, use a cloth wipe or flannel liner in between your diaper and baby's bum. When you do your wash, launder these liners separately.
Before washing, all breastfed solids are water soluble. No rinsing needed, just drop the diaper in your wetbag or dry pail and wash every 1-2 days. If you formula feed or have introduced solids, you will need to dump solids into the toilet (I love a diaper sprayer for this), then put the rinsed diaper in your wetbag or dry pail until wash day.
In my HE washer, this is what I do, your routine may be a bit different.
Step 1: Cold wash - no detergent. This removes any solids left.
Step 2: LONG Hot wash with pre-rinse and extra rinse after - 2 TBS Rockin Green Classic Rock unscented detergent (formula may be different depending on your water type, test it first)
Step 3: Remove unlined shells and pail liner, hang to dry
Step 4: Regular hot wash cycle - no soap, check to make sure there are no suds left.
Step 5: Hang dry or tumble dry on low
After all the diapers are washed and dried, you can take the time to stuff the diapers. I recommend taking off your rings to do this so you don't snag the PLU lining in the diapers.
My son loves to try and help put the diapers together. This makes a great learning opportunity! I show him how the snaps work, and describe the diapers colors and prints.
Now, occasionally you will find "funk" when your diapers are wet. This is usually caused by soap build up. Ammonia can also happen for the same reason. Here is a GREAT chart on combating issues with cloth diapers from Padded Tush Stats.
Help, my diapers stink!
Tuesday, May 15, 2012
Modern cloth
Modern Cloth Diapers Don't Need Pins
When I got pregnant in 2010, I knew there would be a lot of decisions in front of me. Breast or bottle, cosleep or room share, sleeping routines, introducing solids and the multitude of other decisions a mom makes on a daily basis.
One thing I knew for sure was that I did not want to use disposable diapers. Reports of chemical burns frightened me. I knew that my skin was already super sensitive, I didn't want to imagine what would happen if I used a chemical laden diaper on my child's bottom for years on end. The other issue was the cost! Keeping a baby in disposable diapers is expensive. Just compare the cost here!
Much to my delight, I found cloth diapers weren't just flats and pins any more, and that I could diaper my child from birth to potty for under $500. This is a huge savings!
Then, much to my dismay, I found that the world of modern cloth diapers is HUGE. Snaps or aplix? Fitted, AIO, AI2, flats and covers? Covers and inserts or pockets? Hemp, microfiber, cotton, bamboo, minky, flats, or prefolds for stuffing? What about diaper creams? What else did I need?
Then the decision on laundry routine! Store purchased detergent, or a special cloth detergent? What is stripping and how do you do it?
I spent a good portion of my pregnancy learning about different diaper companies, detergents, laundry routines, stripping routines, and most important, learning what diapers I wanted to use. Like most moms, I wanted to get the most "bang for my buck" so I decided that a one size system would work best for me. The downfall of these systems was my fear, a baby too small to use them right away. I have since learned that you can get around this with covers and prefolds on a newborn, but there are now some great companies coming out with newborn diapers that fit really well!
Much to my delight, I learned that cloth diapered babies rarely have diaper rash. Even better, because they can feel the wetness, many potty train much earlier and easier than their disposable diapered counterparts.
When I tried to share my new found love of cloth diapers, many told me that I wouldn't last a month. That the laundry, leaks, stains, and old school problems found in cloth diapering would make me quit early on, but this made me even more determined! Now when people see the cute fluffy bum on my baby, the same people are impressed with modern cloth.
Through this blog, and favorite blogs of mine, I hope to share my love of modern cloth with other people out there who are facing some of the same decisions that I've already gone through.
Subscribe to:
Posts (Atom)